Table of Contents
- Why Proper Documentation Matters for Snagging
- Common Cosmetic Defects in New Builds
- Step-by-Step: How to Document Snagging Issues Effectively
- How to Write a Snagging Report
- Snagging Tools for Homeowners and Property Managers
- Communicating Your Snagging List to the Builder
- Common Mistakes When Documenting Snagging Issues
- Frequently Asked Questions
Last Updated: September 4, 2026
Why Proper Documentation Matters for Snagging
Documenting snagging issues properly is the difference between a quick resolution and months of back-and-forth disputes with your builder. When you move into a new build, defects are inevitable. The question is whether you have clear, defensible evidence of what needs fixing.
Poor documentation leads to arguments about what was actually wrong, whether damage was pre-existing, and who's responsible for repairs. Good documentation removes ambiguity. It creates a paper trail that builders can't dismiss, gives you leverage in negotiations, and protects your interests if the matter escalates.
The stakes are higher than most homeowners realise. Builders have snagging schedules and timelines. If your list is vague or poorly presented, items get overlooked, forgotten, or deprioritised. Clear, professional documentation signals that you're serious, organised, and won't accept excuses. It also helps when you're managing multiple properties, landlords and facilities managers with dozens of units need systems that scale.
Surface Magic Repairs has worked alongside property managers and developers handling large snagging lists across new-build developments. The ones who succeed are those who treat documentation as a formal process, not an afterthought. They photograph everything, measure precisely, describe clearly, and present it all in a structured report. That's what gets results.
Common Cosmetic Defects in New Builds
New builds accumulate cosmetic damage during construction and before handover. Understanding what counts as a snagging issue helps you spot what matters and what's genuinely minor wear.
Typical cosmetic defects include:
- Chips and cracks in bathroom tiles, ceramic sanitaryware, and worktops
- Scratches on laminate surfaces, kitchen units, and fitted furniture
- Burn marks, stains, and discolouration on worktops and bath surrounds
- Dents and dings in doors, frames, and UPVC window sills
- Paint marks, scuffs, and uneven finishes on walls and woodwork
- Missing or misaligned grout, silicone, or sealant
- Brickwork damage, mortar smudges, or uneven pointing
- Water damage, condensation marks, or mould patches
- Loose or rattling fixtures, handles, or hinges
Not every imperfection is a snagging issue. Minor dust, surface dirt, and small marks that disappear with cleaning don't count. But anything that affects appearance, function, or durability should be documented. If you wouldn't accept it in a property you were renting out or selling, it belongs on your snagging list.
The key is consistency. Document everything that falls below the standard you're paying for. Builders expect snagging lists. They budget for repairs. What they won't tolerate is vague complaints or selective documentation that looks like you're being difficult.
Step-by-Step: How to Document Snagging Issues Effectively
Documenting snagging issues requires a systematic approach. You need photographs, measurements, written descriptions, and a clear record of location. This section walks you through the process.
What to Photograph and How
Photographs are your primary evidence. They need to show the damage clearly, prove its location, and demonstrate its severity.
Take three types of photos for each issue:
- Wide shot: Shows the room and the general location of the defect (so the builder knows which unit, which room, which wall)
- Close-up: Shows the damage in detail, filling the frame so the defect is unmistakable
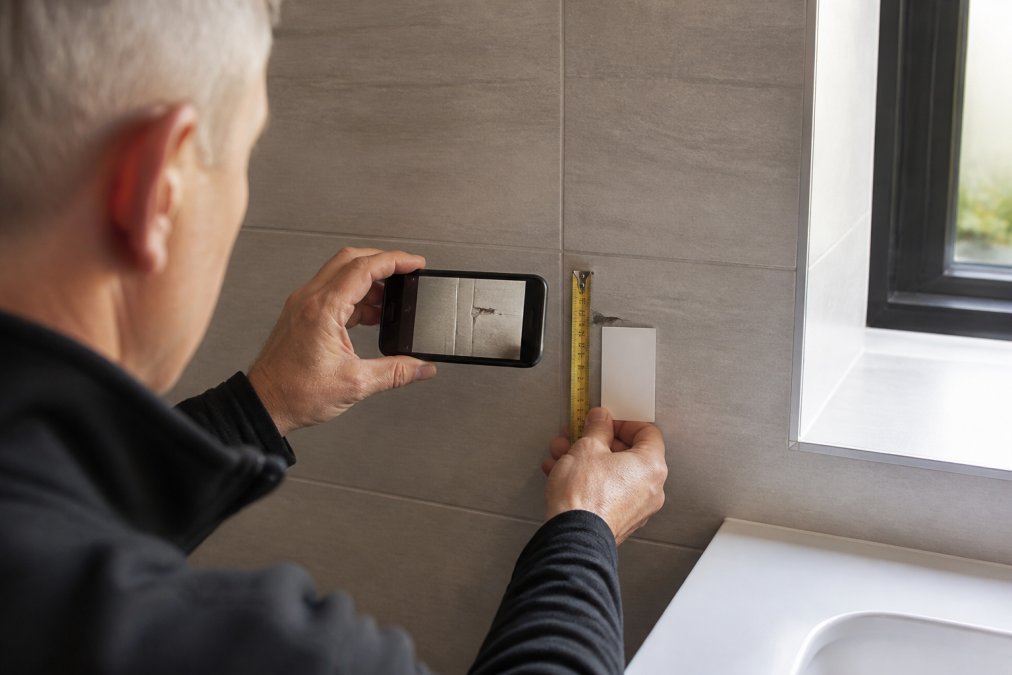
- Reference shot: Shows the damage next to a measuring tape, coin, or credit card for scale
Use natural light where possible. Harsh shadows or poor lighting make defects harder to see in photographs. If a room is poorly lit, use your phone's flash or open curtains. Photograph from multiple angles if the damage is three-dimensional (a dent, crack, or chip).
Avoid cropping or editing photos. Builders will assume manipulated images are exaggerated or misleading. Keep the files at full resolution. Name them clearly: "Bedroom_1_Tile_Crack_1.jpg" rather than "IMG_2847.jpg". This matters when you're managing dozens of defects across multiple units.
Recording Measurements and Locations
Measurements prevent disputes about severity. A builder might dismiss a "small scratch" until you show it's 50mm long and 3mm deep.
For each defect, record:
- Location: Room name, wall or surface, distance from a fixed point (corner, door, window)
- Dimensions: Length, width, depth (for chips and cracks), or diameter (for circular damage)
- Condition: Describe what's visible, sharp edges, paint loss, surface degradation
Use a steel measuring tape, not a cloth one. Measure in millimetres. Write measurements directly onto a notepad while you're on site, not from memory later. If you're managing multiple properties, use a simple spreadsheet or mobile app to log locations and measurements as you go.
For complex layouts or multiple units, sketch a rough floor plan and mark defect locations. You don't need artistic skill, a simple diagram with room labels and numbered defect markers is enough. This helps the builder's team navigate your list without confusion.
Creating Clear Written Descriptions
Your written description should be specific enough that someone unfamiliar with the property understands exactly what's wrong.
Write like this:
"Bathroom, east wall, ceramic tile at height 1.2m above floor, 200mm left of shower enclosure. Diagonal crack running 45mm across tile surface. Crack appears to propagate from impact damage. No loose fragments, but sharp edge along crack line poses risk."
Not like this:
"Bathroom tile cracked. Looks bad. Needs fixing."
Include what caused the damage if you know (impact, manufacturing defect, poor installation). Note whether it's safe or poses a hazard. Mention if the damage affects function (a loose tile that could fall, a worktop burn that's exposed to water).
Be honest about severity. If something is minor, say so. If it's significant, be clear. Builders respect straightforward assessments. They're sceptical of lists that treat every scratch as catastrophic damage.
How to Write a Snagging Report
A snagging report is a formal document that consolidates all your findings. It's what you'll submit to the builder and reference if disputes arise.
Structure your report like this:
- Header: Property address, your name, date of inspection, property type (new build, renovation, etc.)
- Summary: Total number of defects, brief overview of areas affected
- Defect list: Each issue numbered, with location, description, photographs, and measurements
- Photographs: Organised by room or defect type, clearly labelled
- Conclusion: Statement that these defects fall below the expected standard and require rectification before you take full possession
Keep the tone professional and neutral. Avoid emotional language ("shocking," "unacceptable," "disgusting"). Let the evidence speak. A builder reading "paint smudges on three walls, grout missing in two bathroom corners, and a 40mm crack in kitchen worktop tile" understands the scope. They can cost the repairs and schedule the work.
Number every defect. Reference defect numbers in your photographs and descriptions. This prevents confusion when the builder's team asks, "Which tile are you talking about?"
Include a date and your signature. This formalises the document. Some builders require a snagging report before they'll process repairs. Having a professional, dated record protects you if there's later disagreement about what was reported and when.
Snagging Tools for Homeowners and Property Managers
You don't need expensive equipment. A smartphone, measuring tape, and notepad are sufficient. But a few tools make the process faster and more reliable.
Useful tools include:
- Smartphone with a good camera: Your primary documentation tool. Ensure adequate lighting and focus on the defect, not the background.
- Steel measuring tape (3m or 5m): More accurate than cloth tapes. Easier to read measurements.
- Spirit level: Identifies whether surfaces are level or plumb. Reveals installation defects that affect function.
- Reference card: A credit card or business card placed next to the defect for scale in photographs.
- Notepad and pen: Record measurements and observations on site, not from memory.
- Mobile app for documentation: Apps like Snag, BuilderMe, or similar allow you to log defects, attach photos, and generate reports. These are optional but useful if you're managing multiple properties.
- Torch or headlamp: Illuminates dark corners and recesses where defects hide.
Don't overthink tooling. The goal is clear documentation, not professional-grade photography. A smartphone photo with a measuring tape in frame is sufficient evidence. Builders care about what's wrong and where it is, not the quality of your photography.
Communicating Your Snagging List to the Builder
How you present your snagging list affects how seriously the builder takes it and how quickly repairs happen.
Submit your list in writing. Email or hand-deliver a formal document. Verbal complaints are easily forgotten or disputed. A written record proves you raised the issues and when.
Be specific about your expectations. State that you expect all items to be rectified before you take full possession, or within a defined timeframe if the property is already occupied. Reference the contract or building standards that apply.
Give the builder a reasonable deadline. Two to four weeks is standard for cosmetic repairs. Unrealistic deadlines create friction. Reasonable ones get results.
Follow up in writing. If repairs aren't completed, send a follow-up email referencing your original snagging report and the agreed deadline. Keep records of all correspondence.
Offer to be flexible on access. If the builder needs to return multiple times or coordinate with other trades, acknowledge that. Cooperation speeds resolution. But don't let flexibility become an excuse for indefinite delays.
Request confirmation of completion. Ask the builder to confirm in writing when repairs are finished and invite you to inspect. This prevents disputes about whether work was actually done.
If the builder refuses to address items or disputes that they're defects, you may need to escalate. Escalation might involve a surveyor's assessment, formal complaint to the builder's customer-care department, or involvement of a construction ombudsman or legal advisor. But most issues resolve through clear documentation and professional communication.
Common Mistakes When Documenting Snagging Issues
Avoid these pitfalls when preparing your snagging documentation.
Vague descriptions. "Kitchen damaged" doesn't help. "40mm burn mark on laminate worktop, 300mm from left edge, near hob" does. Specificity prevents arguments.
Poor-quality photographs. Blurry, shadowy, or distant photos don't prove anything. Take multiple shots from different angles. Ensure the defect is clearly visible.
Missing measurements. A builder can't assess severity without dimensions. Always measure. Always record.
Mixing major and minor issues. If your list includes both serious structural concerns and minor cosmetic scratches, builders dismiss the whole thing as exaggerated. Separate genuine defects from trivial wear.
Emotional or aggressive tone. "This is unacceptable and shows the builder's incompetence" weakens your case. "This defect falls below the contracted standard and requires rectification" is more effective.
Unrealistic expectations. Some defects are genuinely minor. Some are manufacturing issues, not construction defects. Acknowledge this. It makes your list credible when you flag items that genuinely matter.
Delaying documentation. Inspect the property within days of handover, not weeks later. Early issues are easier to attribute to construction. Late complaints invite questions about whether damage occurred after you took possession.
Failing to keep copies. Always retain copies of your snagging report, photographs, and correspondence. You may need them if disputes escalate.
Not following up. Submit your list and assume it's being handled. Follow up in writing. Confirm completion. Without follow-up, items slip through cracks.
Documenting snagging issues properly protects your investment and accelerates repairs. A clear, professional snagging report signals that you're organised and serious about standards. Builders respond to that. When defects appear in your new build, treat documentation as a formal process. Photograph everything, measure precisely, describe clearly, and present your findings in a structured report. This approach works whether you're a homeowner with one property or a facilities manager overseeing dozens of units. Surface Magic Repairs has supported property managers and developers managing large-scale snagging by helping them understand which cosmetic defects can be repaired in place and which require replacement, a distinction that shapes your snagging strategy and repair budgets. Get an instant quote from Surface Magic Repairs to assess which of your documented defects can be restored through specialist cosmetic repair rather than full replacement.
Building Safety Act guidance on new build defects
National House Building Council standards for cosmetic defects
Consumer Rights Act 2015 provisions on goods of satisfactory quality
Frequently Asked Questions
What is the best way to document snagging issues?
Photograph each defect from multiple angles in good natural light, record exact locations and measurements, and write clear descriptions noting the material and type of damage. Use a checklist app or spreadsheet to organise your findings by room. Consistency matters more than perfection, builders need enough detail to locate and assess each issue without ambiguity. Include scale references like a ruler or coin in photos where damage is small.
What are the most common cosmetic defects in new build homes?
Chips and cracks in bathroom sanitaryware, scratches on kitchen worktops, damaged tiles, scuffs on UPVC frames and doors, paint marks on walls, and stains on fitted furniture appear most frequently. These defects typically occur during construction, transport, or fitting work. Documenting them early, ideally before handover, gives you the strongest position to request repair or replacement before taking possession of the property.
How do I present my snagging list to the holeveragebuilder?
Submit a formal written report organised by room or area, with photographs, measurements and descriptions for each item. Use clear language and avoid emotional language, focus on facts. Deliver it in person if possible, with a copy retained for your records. Request a written response confirming which items the builder will address, the timescale, and any items they dispute. Keep all correspondence for your records in case disputes arise later.
Is there a deadline for reporting snags in a new build?
Most new build warranties require defects to be reported within a specific period, typically between 12 weeks and 12 months of completion, though this varies by developer and warranty provider. Check your NHBC warranty or equivalent documentation for exact timescales. Reporting early protects your rights, as delays may affect your ability to claim rectification. Some builders offer a formal snagging inspection period before handover, leverage this opportunity fully.
This article was written using GrandRanker